
During the first part of September 2019, accompanied by my (very patient) sister, visits were made to many of the parish churches on the Island and the Manx Museum in Douglas to photograph these Crosses and gather information about them. These photographs combined with reference books and the new three dimensional laser scans launched in 2019 by Manx National Heritage form the basis of my study.
I will also focus on a cushion that was sitting on a chair in Harry Kelly's Cottage at the Manx National Heritage Village at Cregneash that caught my eye (6-1). Knitted in Manx Loaghtan wool, the knitted pattern intrigued me as not only does it feature interlacing but also appears to be knitted on the vertical, rather than the more normal horizontal knitted structure.


I started with a few simple samples:

6-4 - 3.5mm needles; washi paper yarn; garter stitch

6-5 - 3.5mm needles; folded paper yarn; garter stitch

6-6 3.5mm needles; stocking stitch; folded paper yarn (front)

6-7 3.5mm needles; stocking stitch; folded paper yarn (back)

6-8 3.5mm needles; basketweave stitch; double knitting wool
Then I focussed on the 'wonky blocks' pattern from the cushion in Harry Kelly's cottage using different 'yarns'.

6-9 3.5mm needles; wonky blocks; cotton ribbon

6-10 3.5mm needles;wonky blocks; ripped scarf strips

6-11 3.5mm needles; wonky blocks; sari silk strips

6-12 3.5mm needles; wonky blocks; climbing plant wire

6-13 3.5mm needles; wonky blocks; dish cloth cotton

6-14 3.5mm needles; wonky blocks; perlé cotton

6-15 3.5mm needles, wonky blocks; Wendy cotton and linen

6-16 3.5mm needles; wonky blocks; washi paper yarn

6-17 3.5mm needles; wonky blocks; Oasis bindwire

6-18 3.5mm needles; wonky blocks; folded paper yarn
Other stitches and 'yarns' were then sampled in an attempt to mirror the carving on the Manx Crosses.

6-19 3.5mm; plait cable; ripped scarf strips

6-20 3.5mm needles, plait cable; ripped scarf strips and folded paper yarn

6-21 3.5mm needles; woven cable stitch; cotton ribbon

6-22 3.5mm needles, woven cable stitch; folded paper yarn

6-23 3.5mm needles; plait cable; folded paper yarn

6-24 3.5mm needles; horseshoe cable; cotton ribbon

6-25 3.5mm needles; horseshoe cable; folded paper yarn

6-26 larger needles; horseshoe cable; folded paper yarn

6-27 3.5mm needles; interlace knitting; folded paper yarn

6-28 3.5mm needles; interlace knitting; dishcloth cotton

6-29 3.5mm needles; interlace knitting; thin metal wire

6-30 3.5mm needles; basketweave stitch; folded paper yarn
Observations from sampling:
- colour/texture - the introduction of coloured/textured 'yarn' to this type of knitting detracts from its beauty - see 6-19,20 (its texture is also detracting from the stitch - 6-10). Pattern is lost with the introduction of colour/texture as there is too much visual noise. My samples are, therefore, predominantly in one colour allowing the stitch to produce its unique surface pattern. It is with good reason that Aran knitting has been in one colour for so long.
- thickness of 'yarn' and size of needle - once the needle becomes too big compared to the yarn, giving too much space in the knitted structure, the pattern becomes less defined and in some cases disappears - see 6-24, 25, 26. This can lead to interesting discoveries in the construction of the stitch and the appearance of the sample - see 6-22, but this was not what I was trying to achieve.
- elasticity of the 'yarn' - this is mainly a personal preference - I found no pleasure in knitting with yarn that had no 'give' i.e. metal, wire core, etc. As the results are so glorious with paper yarn I persevered with this, though only the folded paper yarn had the strength to produce some of the cable stitches, the washi paper yarn breaking with the strain of the construction process.
Many of the Crosses are fragments and show wear. Rather than drop stitches and lose the construction of the stitch I decided to experiment by knitting with materials that I could heat distress, i.e. Tyvek material (from Tyvek overalls from a charity shop), horticultural fleece and white spunbond corovin. This would allow me to heat distress my knitted surface pattern and fingers crossed would give me some interesting 'aged' results, sympathetic to the appearance of the Crosses. I also coloured them grey, using various methods, to see what happened when these were heated.

6-31 3.5mm needles; plait cable; Tyvek

6-32 3.5mm needles; four rib cable; Tyvek

6-33 3.5mm needles; basket cable; Tyvek


6-36 3.5mm needles; woven cable; Tyvek

6-37 black Quink; Paynes Grey Golden Fluid acrylic; Payne's Grey Inktense


6-39 10mm needles; garden fleece


6-41 10mm needles; garden fleece; woven cable
Observations from further manipulation of samples
Taking some of the samples above I heated them gently with a heat gun, both sides. There was shrinkage on all the samples, those coloured with acrylic having less shrinkage as the acrylic appeared to stablise the fabric and make it less susceptible to the heat. Also, where the maximum heat was applied there was concentration of colour as the fabric shrank. All samples hardened but those coloured with all but acrylic hardened less. Additional work was carried out on some of the samples as detailed below.

6-42 Payne's Grey Inktense pencil; Tyvek
I was relieved that when heated, the Tyvek in this structure, didn't give the characteristic bubbling one would normally expect. If this had occured I would have had to start my experiments again with other materials.

6-43 Ink Black Inktense pencil; Tyvek


6-50 Pewter procion; Corovin; garter stitch
On heating Corovin it tended to disintegrate, rather than 'melt' as the Tyvek did. This was not what I was after.

On heating the garden fleece it behaved as the Corovin had done.

The garden fleece with a knitted pattern became unrecognisable on heating.

So Tyvek was giving me the effect I was after, painted with acrylic, but the question arose, should it be coloured before or after heating. I therefore took unpainted samples 6-54,5 and heated them. Once cool I painted them 6-56,7.
Additionally, I had the option of varying the width of the Tyvek strips cut for knitting.


I wasn't surprised that the Payne's Grey Golden Fluid Acrylic appeared very blue as I had had this result with it before (shame I have a large bottle). I peferred the Daler Rowney acrylic. Applying heat to the Tyvek and then colouring it gave me better options than colouring it first as I could apply as many additional layers of paint until I had the desired effect. It also meant I didn't have to heat the acrylic (Health and Safety).
Resolved Sample Created from A Knitted Fabric
Based on the criteria given, the resolved sample needs:
- to show knowledge of how to control the technique
- not to be just be a happy accident
- have a specific aim
- be based on a design
From the samples already made I had the basis for my design, based on the designs on the Manx Crosses. These I wanted to appear as if in situ surrounded by grass - perhaps a little morbid, but I decided to go with it. I considered how I would make the Tyvek structures rigid enough to stand. My first thought was pelmet vilene but this was too heavy for what I wanted. My second thought was aluminium modelling mesh, but again I thought this too fussy. I decided to back the Tyvek pieces with calico and then wax the pieces for rigidity. I tested whether this was feasible on a piece of Tyvek knitted in stocking stitch and then melted, 6-58.

This I free machine stitched to calico painted with matt white emulsion and then painted it with Daler Rowney Payne's Grey acrylic, 6.59.

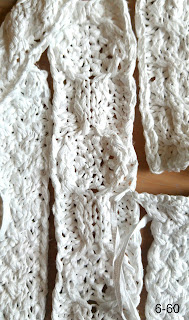
Five panels of Tyvek were then made using lengths cut with approximately 5mm width. The stitches used were woven cable (6-65), double cable (6-61), 5 rib cable (6-63), banjo cable (6-62) and six stitch cable (6-64). These are shown before distressing in 6-60 and after heat distressing in 6-61 to 6-65.


The final resolved sample shows the cut down distressed panels in their final arrangement. Once the pieces were machine stitched together they were waxed with paraffin wax to give them the rigidity for the piece to stand.

6-68 shows the light shining through some of the holes in the backing calico.

6-69 Aerial view of panel.


Five panels of Tyvek were then made using lengths cut with approximately 5mm width. The stitches used were woven cable (6-65), double cable (6-61), 5 rib cable (6-63), banjo cable (6-62) and six stitch cable (6-64). These are shown before distressing in 6-60 and after heat distressing in 6-61 to 6-65.


These were then free machine stitched to calico painted with white emulsion and then painted with Payne's Grey as above. When dry, the detail was highlighted with silver metallic rub-on and white Inktense pencil. Holes were made through the backing calico with an awl where some of the Tyvek had distressed to holes. A piece of monoprinted calico was also prepared to mimic grass. The first placement of the distressed Tyvek panels in the grass is shown in 6-66.

The final resolved sample shows the cut down distressed panels in their final arrangement. Once the pieces were machine stitched together they were waxed with paraffin wax to give them the rigidity for the piece to stand.

6-68 shows the light shining through some of the holes in the backing calico.

6-69 Aerial view of panel.
