Friday, 22 February 2019

Diploma Chapter 11 - Expressive Figures - Option A - Part 1

I had planned to study Chapter 12 - Option B - Head and Face Designs but following a wonderful visit to the Edward Bawden Exhibition at the Dulwich Picture Gallery I did a U-turn.  I was particularly struck by the fluidity of movement and personalities of the dancers round the maypole in the Map of the British Empire Exhibition (watercolour 1924), MM196.


(By the way, I also loved his Panorama: The Seaside - more on that later - and the mark-making and use of colour in his 1927 Untitled landscape with sunset.)

Part 1 of this chapter is my relevant research to date into artists - all media - who use the figure form in expressive ways, with the emphasis on movement and abstraction.  Though I've looked at a lot of artists I include here those which appealed to me.  This research is on-going and being collected in a 20cm x 20cm sketchbook, both line drawings and sketches of work. Some comparisons have also been made between figures from Opus Anglicanum and Indian textiles, and contemporary artists.

So in no particular order, but starting by carefully dipping a toe into the water with the Bayeux Tapestry, Harold on mission to Normandy, 11th Century, MM197.


From Picasso's sketches I chose his stick-figure of a photographer, MM198,


and his Dance of Youth, MM198.  Both were full of movement and the Dance of Youth reminded me of an abstracted Bawden.  I also studied his 'one-liners' of the human form.


Then three pieces by Matisse, his Jinx from Poésies, MM200;  Necklace, MM201;  and Blue Nude, MM202.


I also looked at the linocuts of Ethel Spowers, particularly The Giant Stride due to its similarity to the Bawden maypole, though stylised, but full of movement.

Lowry, The Rush Hour, MM203


Keith Haring, Untitled, MM204. I love the way just a few marks outside the form give a sense of movement and humour.


I looked at the sketches of Henry Moore, but here include here three sculptures by Antony Gormley, the two on the left from Lake Ballard in Western Australia and the one on the right from the new exhibition, Essere, at the Uffizi.


Now, an unlikely choice? The hand-drawn stick figures of Edna Mae Burnham are as iconic as the piano tutors they illustrate...interesting they were meant only to show the position where the 'real' drawings should be inserted.  They are full of life and movement - up and down the keys - running, walking, leap frog, giant steps, etc. etc.


Starting to look for comparisons between figures observed in Opus Anglicanum and contemporary textile artists, I started with a figure from the Jesse Cope, 1310-20, MM207; similar figures from The Becket Casket, 1180-90, MM208; and the figure of Peter the Deacon from the St Cuthbert's Maniple, early 10th century, MM209.


The stance of these figures bore a marked similarity to those in a work by Hilary Hollingworth,   'Gandhi came to 'whistle', one of my favourite pieces, MM210.  The body is held in a similar position with the hands and feet showing, though Gandhi did expose a little more leg.  In contrast to the stitching techniques already discussed in the Opus Anglicanum section, Hilary Hollingworth uses techniques which add layers to the ground including her own darning/weaving technique whereby an additional directional warp is inserted on top of the ground and needleweaving is carried out through this.  This gives the directional interest as the warp changes and also forms texture in the robes. The needleweaving can be dense or loose for additional interest in the surface texture.  Also used are collage, patchwork, dry-felting and hand stitching. Delightful.


Image MM211 is a line drawing of a piece by Belinda Downes used to illustrate the carol Hark! The 'Herald Angels Sing' in the book 'Silent Night Carols for Christmas' which is illustrated with her embroideries.  Once again the stance of Mary is similar to the earlier embroideries.  The work here is applique and the detail of the folds in the cloth is obtained by different sizes and colours of running stitch.  The surrounding angels are enclosed in roundels, a design element frequently used in Opus Anglicanum embroideries.  The ground is machine embroidered in vermicelli stitch which gives a similar appearance to the vine motifs in the Jesse Cope.


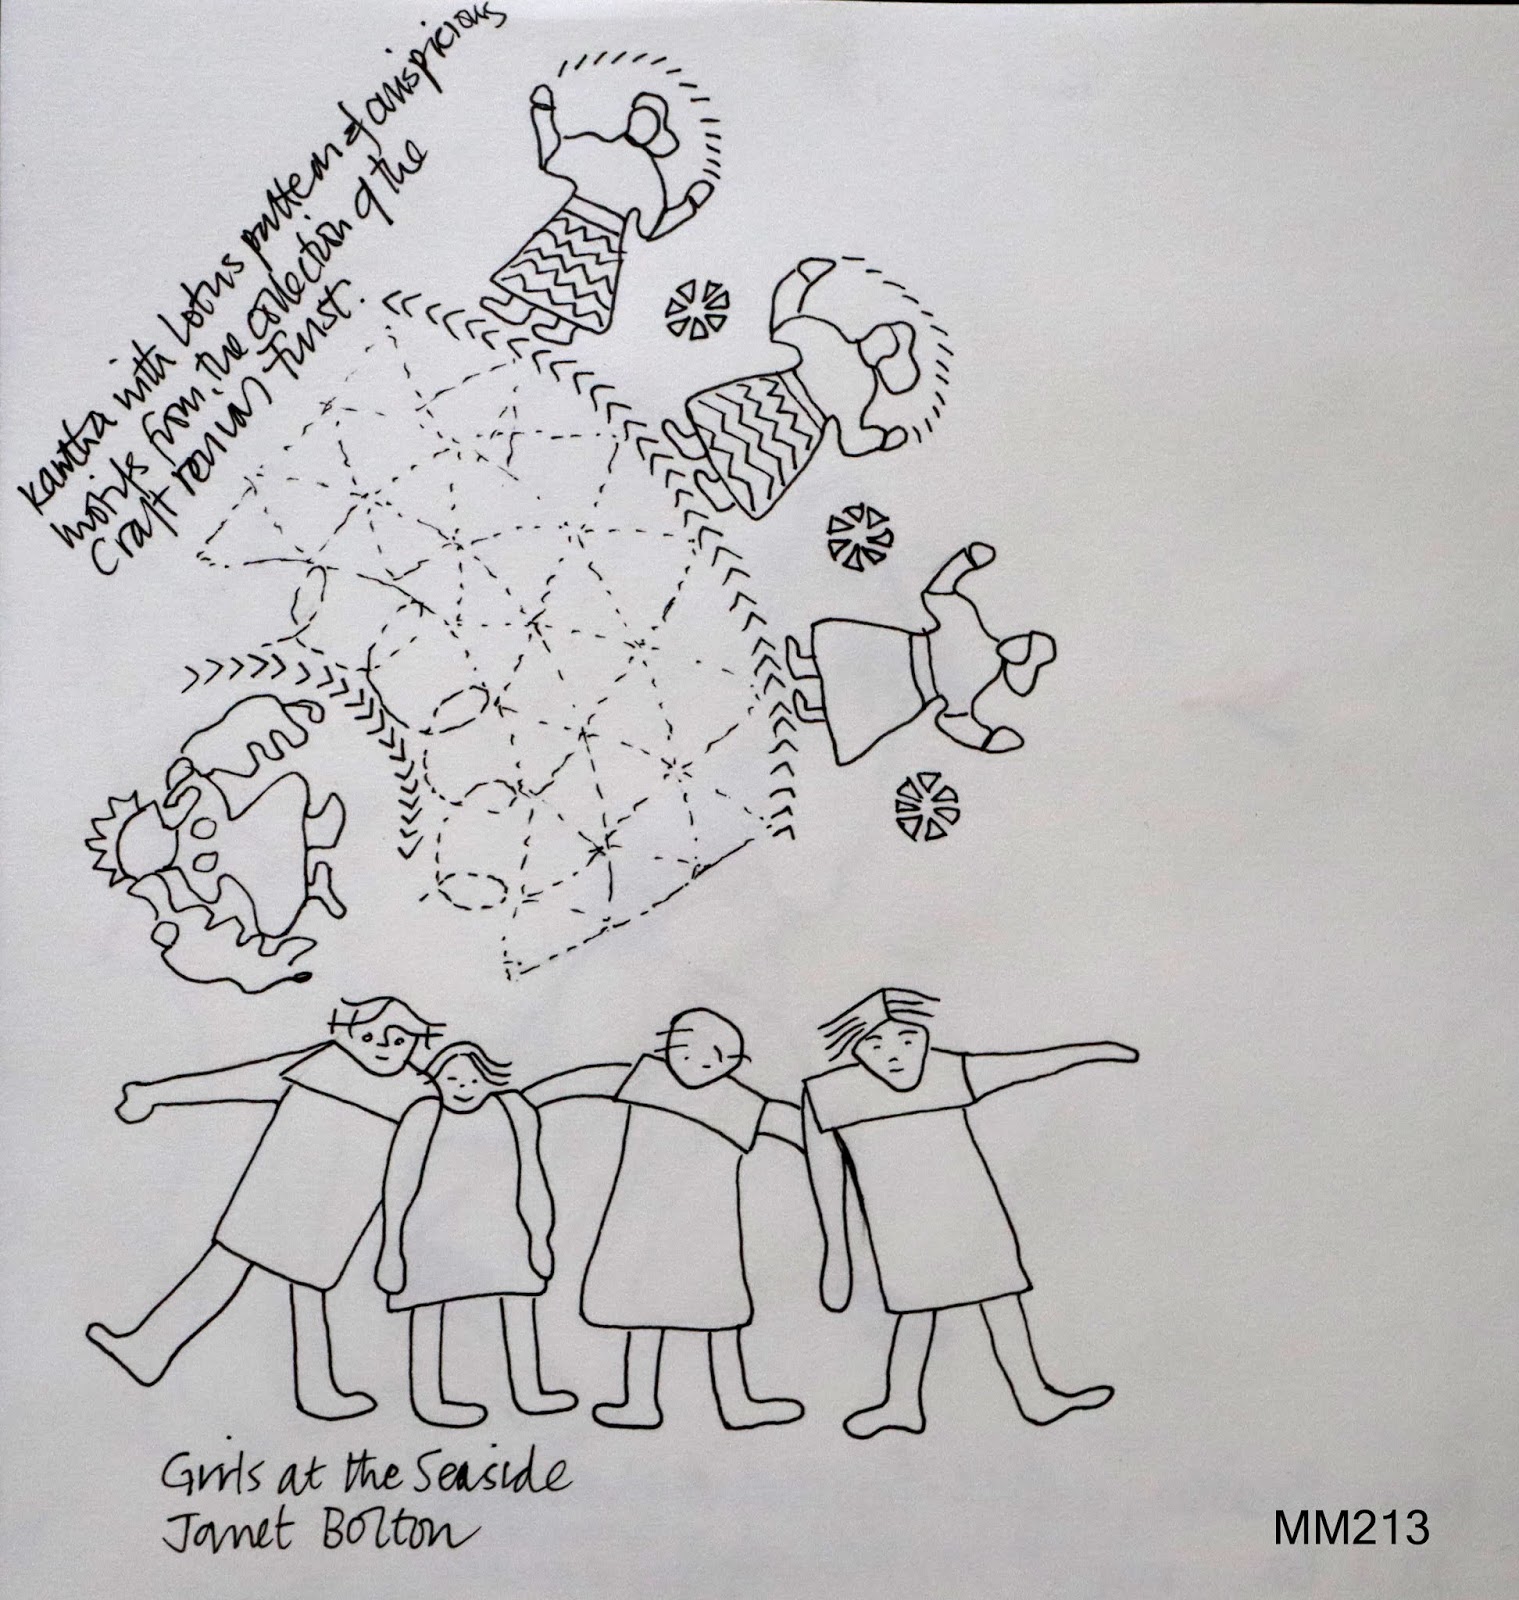
MM212 illustrates design elements from Indian embroideries, a Chamba Rumal from Himachal Pradesh and applique figures from a wall hanging made in Delhi.  Belinda Downes in illustrating The Starlight Princess used similar figures when illustrating the story of The Starlight Princess.  These and the simple outline figures from the kanthas of West Bengal remind me of the simple figures used by Janet Bolton in her applique work, MM213.


More stylised but still with a similar simplicity are the figures of Rachael Howard, inspired by a work placement in India.


Saturday, 13 October 2018

Diploma Chapter 10 - Contemporary Stitched Samples to Translate Areas of Decorated Papers

The first two samples are based on MM134 from my shisha textile study in Chapter 6.


Sample 1 - Image MM185


Image MM134 was inkjet printed onto Seawhites 140gms extra wet strength paper.  The centres of the circles were removed using a scalpel. Inside top papers from Nescafé Azera, Philadelphia cheese and crab pate - each with different surface shininess - were polished using the back of a teaspoon and then embossed using the original stitched punch pocket as a relief source.  Again the centres were cut out.  Using free machine embroidery, a 90 ballpoint needle, metallic thread in the top and grey cotton in the bobbin, herringbone stitch from the design was mirrored to attach the embossed metallic circles and add additional detail.  Though some of the embossing was lost through handling, enough was retained to give the three metallic circles the characteristic relief of the original design.

Sample 2 - Image MM186


Using waxed calico (prepared as in the first section of Chapter 2) and handstitching, this sample contains the main design features of MM134.  The centres of the cirles were removed before stitching and the holes used by the herringbone stitch were made using an awl before stitching. Image MM187 shows the surface texture created.


Sample 3 - Image MM188


This sample used the tissue from Image MM123 which was attached to even weave fabric using paraffin wax.  It was then hand stitched with metallic thread - French knots of various sizes, running stitch and back stitch to emphasize the main features of the design and add surface texture. Image 189 shows the surface texture created, both with the stitching and the wax.


Sample 4 - Image MM190


The blue teabag paper decorated with Markal Paintstik from Image MM91 was attached to evenweave using dilute PVA.  This stabilised the teabag paper and gave a background for machine stitch.  The outer circles were free machine embroidered with metallic gold on the top and navy machine embroidery thread in the bobbin in a circular motion.  The tension was adjusted to pull the bobbin thread to the surface. The inner circles used light blue metallic in the bobbin.  Due to the vagaries of metallic thread this was more difficult to control and therefore less prevalent on the surface of the work.  The additional details were free machined, sometimes using ziz-zag to represent dots.  This sample fell a bit flat.


Sample 5- Image MM192


The tissue image from MM138 was attached to Seawhites 140gms extra wet strength paper using dilute PVA.  The paper created was cut in half and repositioned.  Using a scalpel, parts of the design were removed. I put a few drops of baby oil in my hands and kneaded gold wrapping paper from a box of Marks and Spencer chocolates until the paper became soft and pleasantly creased - momigami - Cas Holmes, The Found Object in Textile Art pages 37-39.  Strips of this gold paper were attached infront and behind the original design with free machine embroidery, mirroring the original herringbone stitching - Image MM191.


I felt this needed more surface texture, so added more topping.  I cut a continuous strip from a tomato pureé tube and couched this to the surface, again mirroring the feeling of the original herringbone stitching - Images MM192/3.


Further Ideas for Applying Fragments of Metal with an Automated Machine Stitch

For both these samples I used a background from my shisha textile study in Chapter 6 - Image MM139 - acrylic on lining paper using gelli plate.


Sample 6 - MM194


Pieces of aluminium shim and silver tissue paper (for the oval) were cut and initially held in place with Pritt.  My Bernina 1015 is rather lacking in decorative stitch patterns, so for this sample many lines of straight stitch were made to hold the metallics in place.  These mirrored the brayer lines created when the sample was printed. The top thread was Madeira variegated metallic machine embroidery thread and the bobbin switched between red mercerised cotton and navy machine embroidery thread.  Some lines of machining had been done before the tissue was added and these picked up the texture of the stitching beneath. 

Sample 7 - MM195


Some of the design was initially cut away using a scalpel (fine detail right and oval on left).  Silver tissue was placed under the design to show through where cut.  Aluminium shim was added on top - detail round oval on left - and held in place with Pritt.  The design was stitched horizontally and vertically with Stitch Pattern 7 - a wavy line.  The top thread was as in Sample 6 with only red in the bobbin.

Sample 5 is the most promising for me as it:

  • is worked on paper
  • has paper cutting, useful for creating shadows
  • has layers
  • has interesting surface texture.

Wednesday, 10 October 2018

Chapter 9 - Alchemy! ...continued

How to Modify Real Metal Surfaces

Polish

MM172/3 - Nescafé Azera packaging front and back


MM174/5 This was rubbed with the back of a teaspoon which removed the embossing and smoothed the surface.


Heat

See Chapter 7.

Emboss

MM176  All surfaces were polished and then, from left to right - pleated, folded, scrunched by hand then partially flatten.


MM177 relief surface of wooden block 'copied' using embossing tool and rubbing with finger.


MM178 reverse of MM177.


MM179 various other relief surfaces created using rubbing surfaces and sequin waste.  Some were also highlighted with acrylic.


MM180 reverse of MM179.


MM181 rubbed with finger over sequin waste


MM182 various metallics fed through a crimping machine.


MM183 folded, punctured with an awl and areas highlighted with acrylic.  The effect from punching with a sewing machine needle can be seen in sample MM156.


MM184 metal placed on soft surface, 'drawn' into with embossing tool and highlighted with acrylic.


Patinate
Ongoing.

Monday, 27 August 2018

Chapter 9 - Alchemy!

*six month interlude*

Colour changes using a metallic thread combined with a coloured thread in machine stitched areas

Image MM157 used WARM rust thread with a selection of metallic threads, all of which were wound on bobbins. The whole sample was worked from the back, framed, and stitched using a darning spring rather than a darning foot.  The top tension was adjusted to vary the amount of colour present. 

The metallic threads used were, from top left to right: 100% nylon gold; Ackerman Isamet silver 0511; Asiro3 metallic variegated; Madeira metallic copper; green metallic; blue metallic; red metallic; skin coloured metallic; Impex gold; Madeira Gold3; Mez reflecta0314; DMC fil argent. Calico ground.


Image158 used COOL royal blue thread with the same metallics as in the above sample and was worked in the same way.  


Image MM159 is the top left square from Image MM158- my favourite!


Image MM160 uses a range of different blue threads - Isacord 3323; pale blue polyester; royal blue polyester; Madiera 2016 variegated; Coats 1210 variegated; Dewhurst cotton D8 royal blue - with Ackerman Isamet 0511 silver metallic thread.  The stitches are worked in different directions creating variations in the reflection of light as well as colour variations depending on the threads chosen.  Calico ground.


Image 161 is the back of Image MM160.  It is easier to see the colours used.


Use of Paints, Inks and Bronze Powders

Image 162 - black linen ground, rubbed with platinum markal paintstik over corrugated card and then overprinted with silver acrylic paint using polystyrene block


Image 163 - black cotton ground, sponged over stencil from Module 1, using L Cornelissen and Co pearl lustre, lilac pearl powder mixed with acrylic wax.


Image MM164 - lustre powder as above, sponged and dragged repeatedly over cardboard cut edge.


Use of Light Gold Markal Paintstik

Image MM165 - gold paintstik repeatedly rubbed over relief cardboard surface. Black linen ground.


Image MM166 - gold paintstik repeatedly rubbed over string stitched on plastic pocket. Black linen ground.


Image MM167 - paintstik on edge of cardboard cutout and dragged onto fabric using stencil brush. Black cotton ground.


Use of PVA

Image 168 - glue line drawn on black linen ground and silver foil applied when dry. This remained sticky so not ideal.


Use of Transfer Adhesive

MM169 - gull shapes cut from bond-a -web and slightly used silver foil (shown behind) ironed on.  Black linen ground.


Image 170 - negative shape from Image 169 applied in the same way.


Image 171 - sample from Lynda Monk workshop using same gull design used previously cut out from coloured pelmet vilene and then foiled in the same way.  A dressmaking pattern has been applied on top of the foil using Golden matt medium to knock back the shine of the foil.